
When you want a safer pool, adding a swimming pool net is a great choice. Designed to help prevent unsupervised access to the pool’s surface, it plays a big part in keeping your pool from becoming the site of one of the nearly 4000 accidental drowning deaths annually. Professional swimming pool net installation gives your pool a flexible safety option that’s easy to care for, can be removed in minutes, and securely reinstalls on even oddly shaped swimming areas. Learn more about one of the best second layers of protection you can add to your swimming area.
Swimming Pool Safety Barriers
The National Drowning Prevention Alliance reports that a lack of adequate safety barriers is a contributing factor in the majority of accidental drownings. That’s why so many jurisdictions, insurance carriers, and HOAs require some kind of safety barrier that prevents unauthorized access to pools in their areas of interest. These safety standards can vary but usually either require a pool fence or alternate barrier, like a swimming pool safety net, that meets certain guidelines. These help protect children, the elderly, and other individuals who may be at higher drowning risk due to mental or physical reasons.
Even in areas where a pool fence is mandated, many responsible pool owners choose to install a second layer of protection. This ensures that even if a particularly determined child finds a way to bypass the safety fence, they’re still deterred from entering the water by a safety device covering its surface. A swimming pool net is a cost-effective addition to your pool area’s safety, and this is owed in large part to its user-friendly design.
- Anchors and Clips – To keep potential drowning victims out of the water, a swimming pool safety net uses strong steel clips that hook the net to anchor points around the pool. In many cases, these are secure keyhole-type anchors that sit flush in your deck, but not all pools have a flat deck area completely surrounding them. Anchor points can also be installed on adjoining walls, structures, and be positioned to guide the net over and around features, such as decorative boulders.
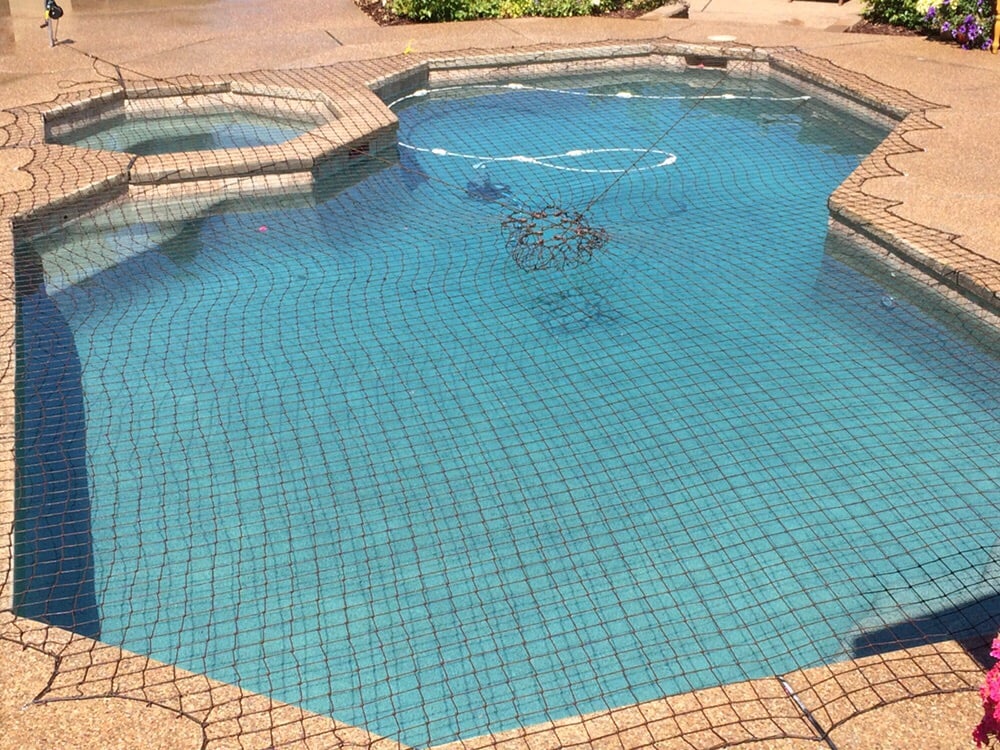
- Twine Netting – The swimming pool net material itself is made of 5mm twine knotted into a gridwork that has openings of approximately 3½”. This keeps weight down while still meeting safety standards designed to prevent children’s small bodies from being able to push through the gap. Unlike swimming pool safety covers that a pet or child could easily walk onto, most children have trouble navigating these wide-spaced openings, causing them to lose footing near the pool’s edge, where they can be more easily pulled to safety–particularly handy if your child or grandchild is a “runner”.
- Central Tensioning System (CTS)- Near the center of the net is a system of springs and pulleys that pull together when the net is anchored, tightening the fabric and allowing it to be adjusted. This system is what allows for a loose swimming pool net for easier installation that then becomes taut enough to hold a full-grown adult above the surface of the water and prevents the anchors from being easily disengaged.
- Tensioning Cord – Running from the CTS to the pool’s deck, this stronger, thicker rope controls the tension applied to your net and then secures it when anchored properly.
- The Titan Tool – For safety, your swimming pool net needs to be more than “hand-tight”. The Titan Tool is a hand-cranked winch that you anchor in a purpose-built deck sleeve and attach the tensioning cord to. It allows you to provide firm, even pressure while tensioning your swimming pool net during installation and when freeing the cord from its anchor point for net removal.
- Net Roller – While not part of the net itself, the roller is a must-have accessory that makes protecting your pool easier. It makes retracting and storing your net out of the way a simple process and can give you an “extra set of hands” during swimming pool net installation by yourself. When not in use, the net is stored on the roller, which can be easily moved out of the way.
Using Your Swimming Pool Net To Protect Your Pool
Securing your pool with a net is easy and only takes a few minutes of your time. Start by positioning your net and roller on the far side of the pool from where your initial anchor clip will be secured. The roller is anchored there to prevent tipping while it is in use. Let’s get started:
- Guide the net to the far end of the pool and secure your starting anchor. – This is the starting point of your installation. Your Lifeguard on Duty pro will show you how to identify both the starting anchor point and clip to make sure you get perfect alignment every time.
- Move methodically around the pool, anchoring each point in turn. – Whether you like clockwise, counterclockwise, or prefer to grab a partner and move symmetrically, taking installation anchor point by anchor point is the best way to make sure your net is properly set.
- Guide your net over or around any obstacles or outcroppings. – Landscaping, raised spas, and ladders can all get in the way of a pool cover, but your swimming pool net is up to the challenge. Guide the net over, making sure that material doesn’t end up bunched or trapped where it can create an untensioned entry point.
- Move the roller out of the way – Once all your clips have found a home in their anchor points, the roller can be moved aside to give you full access to the area around your pool and net.
- Set up your Titan Tool to tension your net. – Remove the color-matched plug from the sleeve and slide the Titan Tool’s base into it. Attach the clip on your tensioning cord to the titan tool. Use the hand crank to apply slow, even pressure until the tensioning cord’s anchor clip can be easily hooked to its anchor point. Ease the pressure on the Titan Tool until the cord’s tension is transferred to its anchor, then disconnect it from your Titan Tool. Remove the Titan Tool and reinsert the sleeve plug.
- Check your work. – Be sure you verify your swimming pool net is properly reinstalled every time it’s removed. This means checking the perimeter for missed anchors, slack, and loose areas that could allow pool entry. This isn’t just an important step for beginners but also for experienced pool net pros who want to make sure familiarity hasn’t led to carelessness.
Protection Tailored To Your Pool Or Spa

You’ve created the perfect, one-of-a-kind backyard oasis for your lifestyle, and we’re proud to help you protect it. Your local pool safety pro both lives and works in your community, where their passion for protecting their neighbors is expressed one pool at a time. When you schedule a free estimate, they’ll take measurements, design a plan to fit your pool’s needs, and give you a written estimate laying out your safety options based on years of experience working with top-of-the-line materials to meet state and local guidelines. For many customers, peace of mind is far more affordably priced than they ever imagined. Take the first step toward protecting your pool and schedule your free quote from Lifeguard on Duty today.


